Zed Lake
A co-worker of mine was investigating the compromise of a self-hosted Jira instance some months ago and he put me on to this amazing analysis tool called Zui. It’s very easy to get started and very simple to get data into the data store, referred to as a Zed Lake. You can set this up on a local machine, but here we’ll deploy a remote lake on an AWS EC2 instance.
The Plan
The goal is to connect our Zui desktop app to a remote Zed lake on AWS.
We must only allow traffic from our IP on TCP ports 22 (SSH) and 9867 (port the Zed lake instance is listening on).
The instance will be created using a cloud-init cloud-config template. We’ll need a few things to get this off the ground.
Note: It’s assumed you’ll already have an AWS account, access to said account, and credentials to complete the AWS portions.
Checklist of resources
- An SSH key pair
- A cloud-config template
- A VPC
- A Security Group
- An AMI (Amazon Linux should fit in the free tier too)
- An EC2 instance in the free tier (think t2.micro or t3.small. For production analysis, you’ll want to use a proper instance type for your use case.)
Prep Work
We’ll want to create an SSH key pair in order for remote access to the instance hosting the Zed lake.
ssh-keygen -t ed25519 -f ~/.ssh/zed -C "zed lake"
Add a password if you desire, then add your key to the ssh-agent.
ssh-add .ssh/zed
And enter your password if you opted for a password.
You should have some output like
Identity added: /home/your-username/.ssh/zed (zed lake)
Make sure to cat your public key (in this case it’d be zed.pub in the .ssh directory). We’ll use that output later.
Creating the cloud-config template
We’re looking to touch the instance the least amount possible. Thankfully AWS EC2 instances are equipped with cloud-init we can leverage and pretty much auto-provision much of our instance.
We’ll go over the template in pieces, then look at it as a complete file.
This template is based on RHEL-based Linux distributions, but can easily be tailored for others (maybe not Arch)
The users section
The user section is where you can add all user accounts and the relevant configuration of those users:
#cloud-config
users:
  - name: zed
    lock_passwd: false
    passwd: your-hashy-password
    ssh_authorized_keys:
      - zed-public-key
    shell: /bin/bash
    groups: wheel
Here we have:
- The #cloud-config top line is mandatory for the rest of the directives to be passed to cloud-init.
- name is the username
- lock_passwd: false makes sure the user we’re creating isn’t locked. For the user to remain unlocked, the user needs a…
- passwd: a password for said user. The openssl passwd -6 command is great for allowing you to create a hashed password
- ssh_authorized_keys: add the public key of your zed user here
- shell: is the default login shell for the zed user
- groups: is the groups the zed user belongs to
The write files section
Next we’re going to have cloud-init write a couple files for us:
write_files:
  - path: /etc/ssh/sshd_config
    content: |
         Protocol 2
         HostKey /etc/ssh/ssh_host_rsa_key
         HostKey /etc/ssh/ssh_host_dsa_key
         HostKey /etc/ssh/ssh_host_ecdsa_key
         HostKey /etc/ssh/ssh_host_ed25519_key
         SyslogFacility AUTH
         LogLevel INFO
         LoginGraceTime 120
         PasswordAuthentication no
         PermitRootLogin no
         StrictModes yes
         PubkeyAuthentication yes
         IgnoreRhosts yes
         HostbasedAuthentication no
         PermitEmptyPasswords no
         ChallengeResponseAuthentication no
         PrintLastLog yes
         TCPKeepAlive yes
         AcceptEnv LANG LC_*
         UsePAM yes
  - path: /usr/lib/systemd/system/zed-lake.service
    content: |
         [Unit]
         Description=Zed Lake Service
         After=network.target

         [Service]
         ExecStart=/opt/Zui/resources/app.asar.unpacked/zdeps/zed serve -l :9867 -lake /home/zed/.config/Zui/lake -log.level=info -log.filemode=rotate -log.path=/home/zed/.config/Zui/logs/zlake.log
         Restart=always
         User=zed

         [Install]
         WantedBy=multi-user.target
So what’s going on here:
- We’re writing a new sshd_config to define some rules. Most important of the rules enforce public key authentication only, disabling password authentication, and disabling root login
- We’re creating a systemd service for our zed serve command to run automatically and also having the lake start at boot. At a high level we’re:
- Telling the zed serve binary to listen on port 9867 on all interfaces:
- We’d usually define an IP here but we’re not sure what IP AWS will assign us
- This can be changed once we know the IP
- Defining the lake
- Defining the log level
- Defining log rotation
- Defining the log path
- Telling the zed serve binary to listen on port 9867 on all interfaces:
The packages section
We’ll want to install some basic packages and update package repositories before we finish out our template.
package_update: true
package_upgrade: true
packages:
  - vim
  - firewalld
Here we’re updating package repositories and any packages that are on the system already and installing a couple packages, chiefly firewalld.
The run runcmd section
Here we’ll define commands we want to run during the cloud-init session. This will round out our template and complete the setup.
runcmd:
  - systemctl enable --now firewalld
  - firewall-cmd --permanent --add-port 9867/tcp
  - firewall-cmd --reload
  - dnf install -y https://github.com/brimdata/zui/releases/download/v1.18.0/Zui-1.18.0.x86_64.rpm
  - mkdir -p /home/zed/.config/Zui/lake /home/zed/.config/Zui/plugins/brimcap/storage/root /home/zed/.config/Zui/logs
  - chown zed:zed -R /home/zed/.config
  - find /opt/Zui/resources/app.asar.unpacked/zdeps/suricata -exec chmod go+w {} \;
  - /opt/Zui/resources/app.asar.unpacked/zdeps/suricata/suricataupdater
  - systemctl daemon-reload
  - systemctl enable --now zed-lake.service
So here we’re:
- Enabling the firewalld service (it usually has its preset as enabled but this will ensure that)
- Adding TCP port 9867
- Reloading firewalld
- Installing the Zui app:
- The Zui app has all the binaries we need for a zed lake, however the zed binary can be installed alone
- Some further configuration for packet analysis
- Creating some directories for Zed. Some of these you saw in the systemd service we created earlier in the template
- Setting ownership back to our zed user. The actions taken by cloud-init are performed by root, so we’ll need to restore ownership or our service will fail to start
- Configuration to enable packet analysis
- Reloading all daemons on the system, as we created a new one for the zed-lake.service
- Enabling the zed-lake.service to auto-start
Note: You might be wondering why we aren’t adding port 22 for SSH. Firewalld has the SSH service added to the public zone by default, so we don’t need to explictly define the port. Administering firewalld is waaaaaaaaay outside the scope of this post.
So the whole template should look like:
#cloud-config
users:
  - name: zed
    lock_passwd: false
    passwd: your-hashy-password
    ssh_authorized_keys:
      - zed-ssh-public-key
    shell: /bin/bash
    groups: wheel
write_files:
  - path: /etc/ssh/sshd_config
    content: |
         Protocol 2
         HostKey /etc/ssh/ssh_host_rsa_key
         HostKey /etc/ssh/ssh_host_dsa_key
         HostKey /etc/ssh/ssh_host_ecdsa_key
         HostKey /etc/ssh/ssh_host_ed25519_key
         SyslogFacility AUTH
         LogLevel INFO
         LoginGraceTime 120
         PasswordAuthentication no
         PermitRootLogin no
         StrictModes yes
         PubkeyAuthentication yes
         IgnoreRhosts yes
         HostbasedAuthentication no
         PermitEmptyPasswords no
         ChallengeResponseAuthentication no
         PrintLastLog yes
         TCPKeepAlive yes
         AcceptEnv LANG LC_*
         UsePAM yes
  - path: /usr/lib/systemd/system/zed-lake.service
    content: |
         [Unit]
         Description=Zed Lake Service
         After=network.target

         [Service]
         ExecStart=/opt/Zui/resources/app.asar.unpacked/zdeps/zed serve -l :9867 -lake /home/zed/.config/Zui/lake -log.level=info -log.filemode=rotate -log.path=/home/zed/.config/Zui/logs/zlake.log
         Restart=always
         User=zed

         [Install]
         WantedBy=multi-user.target
package_update: true
package_upgrade: true
packages:
  - vim
  - firewalld
runcmd:
  - systemctl enable --now firewalld
  - firewall-cmd --permanent --add-port 9867/tcp
  - firewall-cmd --reload
  - dnf install -y https://github.com/brimdata/zui/releases/download/v1.18.0/Zui-1.18.0.x86_64.rpm
  - mkdir -p /home/zed/.config/Zui/lake /home/zed/.config/Zui/plugins/brimcap/storage/root /home/zed/.config/Zui/logs
  - chown zed:zed -R /home/zed/.config
  - find /opt/Zui/resources/app.asar.unpacked/zdeps/suricata -exec chmod go+w {} \;
  - /opt/Zui/resources/app.asar.unpacked/zdeps/suricata/suricataupdater
  - systemctl daemon-reload
  - systemctl enable --now zed-lake.service
Now that we have most of the prep work done, we can move into AWS.
The Cloud Side
We have a whisker bit of prep 🫠 to do here in AWS as well. We’ll start with the networking side before worrying about the instance.
Creating the VPC
The easiest part of our setup.
aws ec2 create-vpc --cidr-block 10.10.0.0/16 --tag-specifications ResourceType="vpc",Tags=['{Key=Name,Value=zed_vpc}']
Record the VpcId from the output, we’ll need it again shortly.
Now we need to create a subnet within our VPC
aws ec2 create-subnet \
    --vpc-id your-vpc-id \
    --cidr-block your-cidr-block \
    --tag-specifications ResourceType=subnet,Tags=[{'Key=Name,Value=zed_subnet}']
Record the SubnetId. That’ll be used shortly as well.
Note: While tagging isn’t necessary it helps to have descriptions of resources for organization purposes. So tag responsibly. Another Note: Depending on your shell will depend where your quotes will need to go. It will throw an error stating its looking for a string and you provided a ‘dict’ if your quotes aren’t where they’re supposed to be.
We’ll need an Internet Gateway (IGW) in order to access the instance. We’ll need to execute a few commands to make that happen:
- aws ec2 create-internet-gateway to create the IGW, record the InternetGatewayId
- aws ec2 attach-internet-gateway –vpc-id your-vpc-id –internet-gateway-id your-igw-id to attach the gateway to our VPC
- aws ec2 create-route-table –vpc-id your-vpc-id to create a route table associated with your VPC. Record your RouteTableId
- aws ec2 create-route –route-table-id your-route-table-id –destination-cidr-block 0.0.0.0/0 –gateway-id your-igw-id to create the specified route:
- Note: We could specifically specify your IP with a /32 here as well, however we have security group rules that handle that so it’s a little redundant
- aws ec2 associate-route-table –subnet-id your-subnet-id –route-table-id your-route-table-id to associate the route with the subnet we created above
Creating the security group
Now that we have a VPC, we can create a security group for use within the VPC. A security group acts like a firewall, where you can assign ingress and egress rules to allow or deny network traffic.
aws ec2 create-security-group --group-name ZedSecGroup --description "Zed Lake Security Group" --vpc-id <your-vpc-id>
Again, record the GroupId. We still need to create rules for our security group.
Creating the Security Group rules
We’ll need to create some ingress rules to allow us to connect to our zed lake and also allow us remote access over SSH. So let’s get after it.
aws ec2 authorize-security-group-ingress \
    --group-id your-security-group-id \
    --ip-permissions 'IpProtocol=tcp,FromPort=22,ToPort=22,IpRanges=[{CidrIp=x.x.x.x/32,Description="Allow SSH access from my IP"}]'

aws ec2 authorize-security-group-ingress \
    --group-id your-security-group-id \
    --ip-permissions 'IpProtocol=tcp,FromPort=9867,ToPort=9867,IpRanges=[{CidrIp=x.x.x.x/32,Description="Allow Zed lake access from my IP"}]'

*x.x.x.x refers to the IPv4 address chosen.*
Yeeeaaahh it’s not super intuitive to add a description but we have some security group rules now. So let’s keep at it.

Creating the EC2 instance
Before we can spin up an instance with our cloud-config template, we’ll need to find an AMI to use. As it was mentioned before, the template assumes a RHEL-based Linux distribution, so we’ll try Amazon Linux as our AMI and t3.small instance type, it’s free tier eligible so perfect for our little project here.
aws ec2 run-instances \
    --image-id ami-03c4f11b50838ab5d \
    --instance-type t3.small \
    --user-data file://zed-lake.yaml \
    --metadata-options "HttpEndpoint=enabled,HttpTokens=required" \
    --tag-specifications 'ResourceType=instance,Tags=[{Key=Name,Value=zed-lake}]' \
    --network-interfaces \
        '{"DeviceIndex":0,"SubnetId":"your-subnet-id","Groups":["sg-your-security-groupid"],"AssociatePublicIpAddress":true}'
Again, we’re ensuring that we use an instance type within the AWS free tier with our t3.small instance type (of course I misread when doing this and used a t3.medium. Be better than me…) and the image we’re using here is Amazon Linux 2023. You’ll also screen of output. That’s information detailing the creation on the instance. You can ssh in using the ssh zed@x.x.x.x where x.x.x.x is the public IP that was assigned to your EC2 instance to ensure connectivity.
Connecting to the Zed Lake
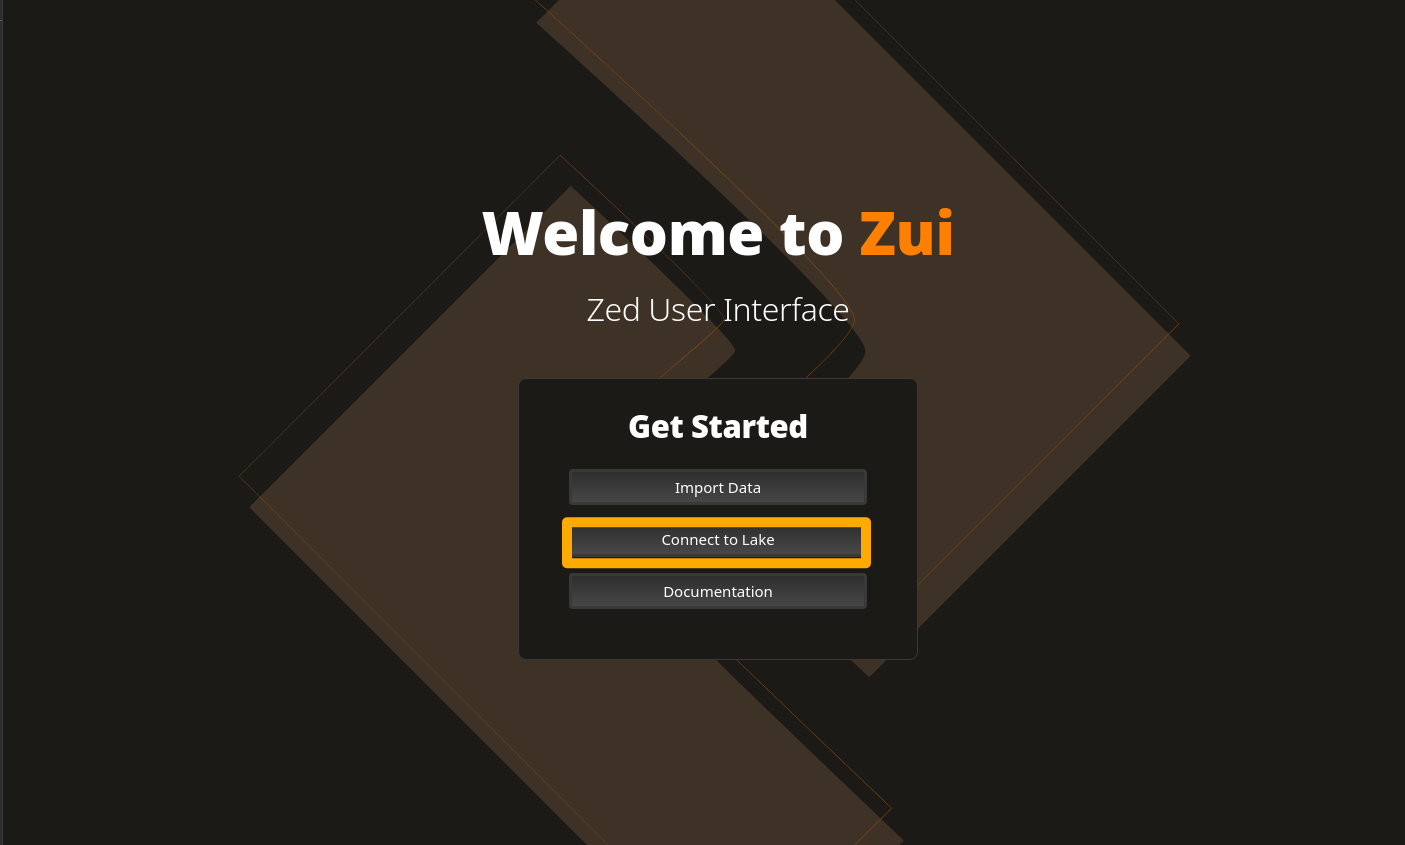
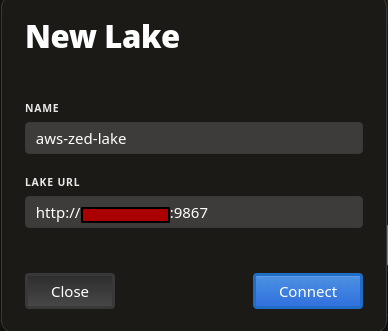
Now that the actual work is over, we can open up Zui on our local machine and connect to the lake we just created.
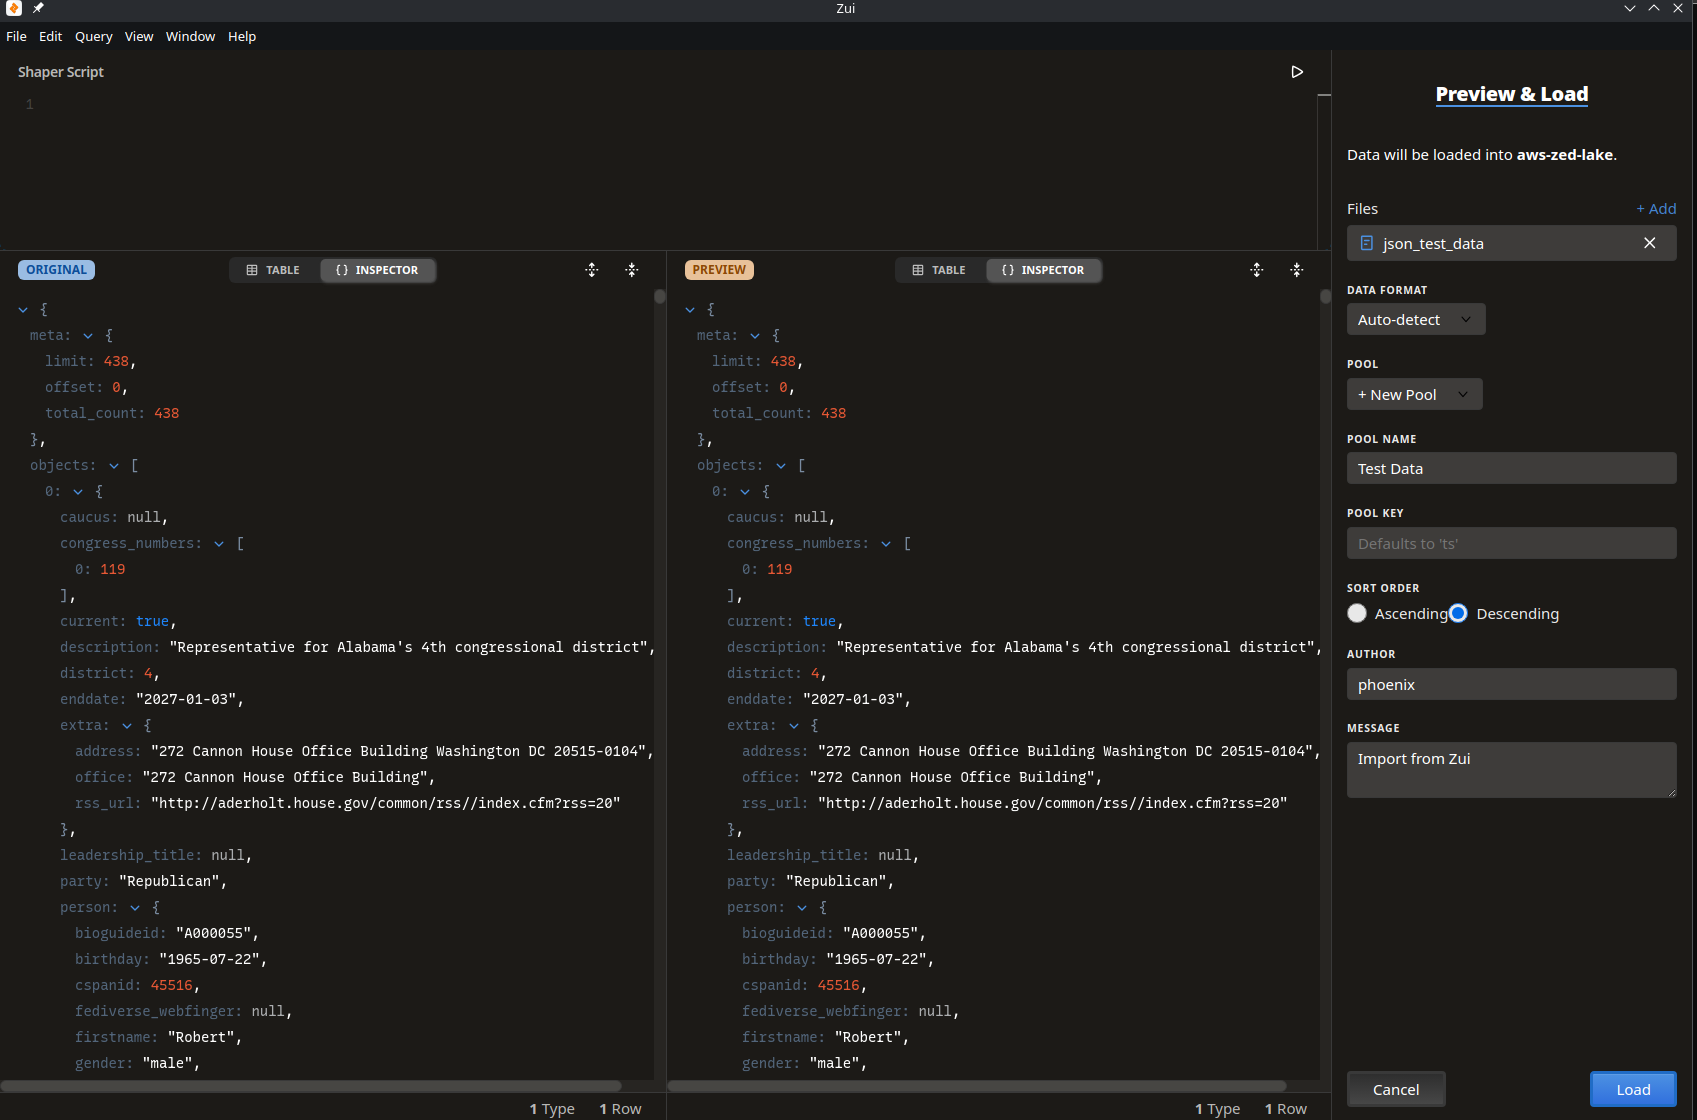
And add some data. You can drag and drop or use the Load Data option in the top right.
And select Query Pool
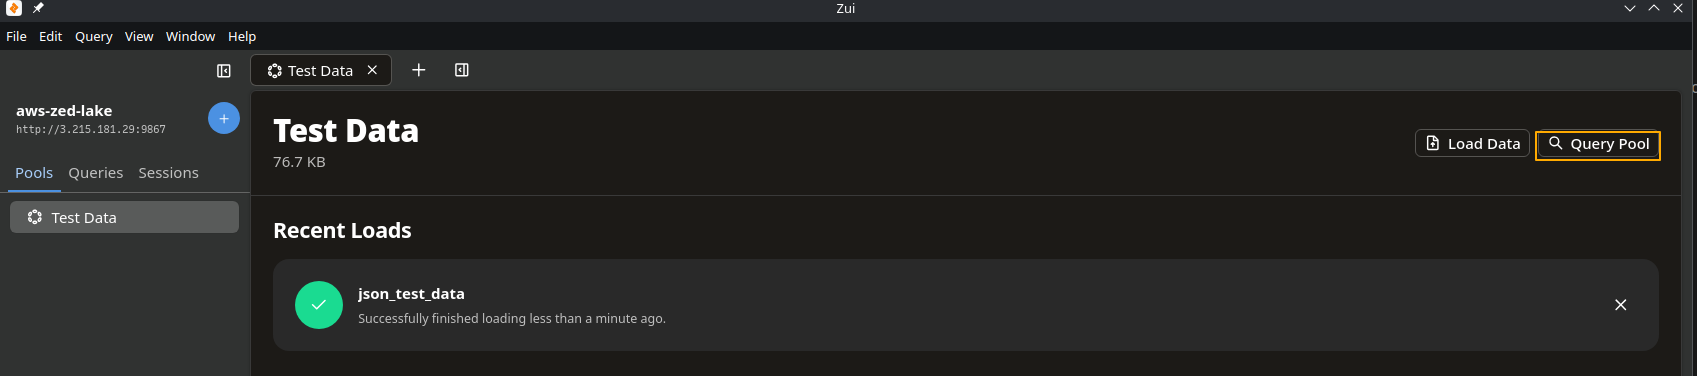
We’ve successfully created our Zed Lake on AWS and successfully connected our local Zui app to the Lake! We won’t go into details into querying the data, as this was only meant to show how to setup the lake on AWS. Consult the docs on how to formulate queries, manipulate data, etc. If you’re familiar with SQL it shouldn’t take long to get comfortable with the Zed language.
As always, make sure you terminate your instance and remove any resources that could continue to create cloud spend. In this case, once the EC2 instance is terminated/deleted, the underlying EBS volume that was running the OS is deleted along with it. Using an IaC solution, such as Terraform, Pulumi, or CloudFormation (😭) would make this a less painful (CloudFormation not so much, but that might be a skill issue on my part 😮💨), however we have the steps to build on that later on. Maybe that’ll be the follow-up to this here. Until then…